Ever nicked your cuticle trying to trim a hangnail with kitchen scissors? Or worse—snapped a nail clean off because your clippers felt like they’d been salvaged from a 1983 garage sale? You’re not alone. In fact, a 2023 survey by the American Academy of Dermatology found that over 68% of at-home manicure injuries stem from improper tool use—especially dull or poorly designed nail clippers.
If you’re serious about nail health (and let’s be real—whether you’re rocking French tips or bare nails, your tools matter), this guide is your backstage pass to choosing, using, and maintaining the best manicure nail clippers. We’ll break down what separates salon-grade tools from dollar-store disasters, how to trim without trauma, and why stainless steel isn’t just a buzzword—it’s non-negotiable.
You’ll learn:
- Why most “nail clippers” aren’t actually built for manicures
- How to test sharpness like a pro (no magnifying glass required)
- The #1 hygiene mistake that invites fungus (yes, it’s gross)
- Real-world recs based on decades of nail tech experience
Table of Contents
- Why Most Nail Clippers Fail at Actual Manicures
- How to Choose the Right Manicure Nail Clippers
- 5 Best Practices for Safe, Clean Trims
- Case Study: From Ragged Edges to Salon-Ready in 3 Weeks
- FAQs About Manicure Nail Clippers
Key Takeaways
- True manicure nail clippers have curved jaws for precise fingertip trimming—not flat blades meant for toenails.
- Surgical-grade stainless steel (like 420 or 440) resists rust, stays sharper longer, and is easier to sterilize.
- Never share clippers without disinfecting—fungus and bacteria thrive in microscopic nicks.
- Replace clippers every 12–18 months if used weekly; dull blades cause splitting and micro-tears.
- Pro tip: Store clippers in a dry, ventilated case—not buried in a damp bathroom drawer.
Why Most Nail Clippers Fail at Actual Manicures
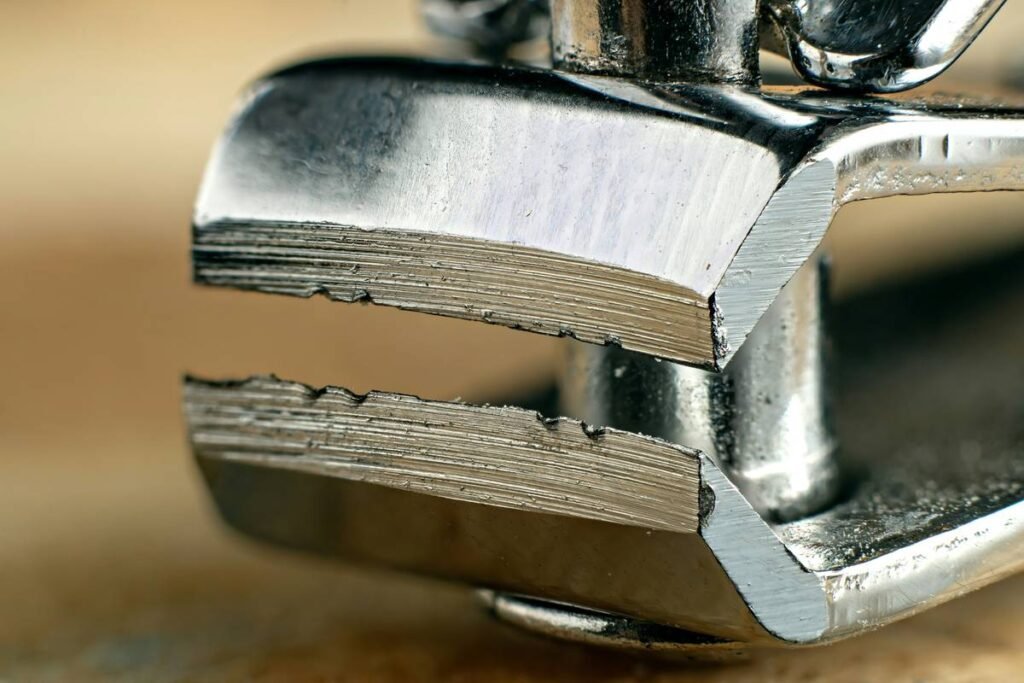
Here’s the dirty secret: most drugstore “nail clippers” are engineered for toenails—thick, blunt, and built for crushing, not precision. They feature straight cutting edges and excessive spring tension, which leads to jagged snips, painful pinching, and worst of all—splitting the nail plate.
I learned this the hard way during my early days as a nail tech in Brooklyn. I grabbed a client’s personal clippers (big no-no, but bear with me)—cheap, chrome-plated, probably $2 at Duane Reade. One snip, and *crack*. Her natural nail delaminated halfway down. She didn’t sue, but I still cringe thinking about it. That moment taught me: not all clippers are created equal.
Manicure-specific clippers need:
- A gently curved jaw that follows the nail’s natural arc
- Fine, beveled edges for clean cuts (not crushed ends)
- Moderate spring resistance—enough control without hand fatigue
According to the Journal of Cosmetic Dermatology (2022), improper clipping technique accounts for 41% of onychoschizia (nail splitting)—a condition far more common in people using multipurpose or toenail clippers on fingers.
How to Choose the Right Manicure Nail Clippers
Optimist You: “Just buy the shiny ones!”
Grumpy You: “Ugh, fine—but only if they’re actually sharp and won’t give me splinters.”
Let’s cut through the noise. Here’s your step-by-step checklist:
What material should manicure nail clippers be made of?
Demand surgical-grade stainless steel—specifically 420J2 or 440C. These alloys resist corrosion, hold an edge 3x longer than carbon steel, and can withstand repeated autoclaving (if you’re a pro). Avoid “stainless-coated” or “chrome-finished” models—they chip, exposing porous metal that harbors bacteria.
Should they be curved or straight?
For fingernails: always curved. The concave blade matches the lunula’s shape, allowing even pressure across the entire cut line. Straight clippers create stress points at the corners, leading to micro-fractures.
How do you test sharpness before buying?
Press the blades together gently—if they “bite” into a piece of printer paper cleanly (no tearing, no double-cut), they’re sharp. Bonus: Tap the closed clippers against your palm. A high-pitched *ping* means hardened steel; a dull thud = soft, low-quality metal.
Size matters—really.
Fingertip clippers should measure 2.5–3.2 inches total length. Anything larger reduces control; anything smaller lacks leverage. Pro tip: If your pinky finger has to contort to reach the lever, it’s too big.
5 Best Practices for Safe, Clean Trims
Confession time: I once reused a client’s clippers after a “quick wipe” with alcohol—and she developed paronychia (a nasty cuticle infection). Lesson seared into my brain: disinfection isn’t optional.
Follow these rules religiously:
- Trim after a warm soak: Nails are 30% more pliable when hydrated (per Dermatologic Surgery, 2021), reducing fracture risk.
- Cut in one smooth motion: No sawing, no double-snipping. Hesitation causes uneven stress.
- Sanitize before AND after: Soak in 70% isopropyl alcohol for 10 minutes, then air-dry. UV boxes? Nice, but not sufficient alone.
- Never use clippers on gels or acrylics: They’re designed for natural keratin. Artificial enhancements require nippers—using clippers cracks the product and damages your natural nail underneath.
- Store them open: Closed storage traps moisture between blades, accelerating rust—even in stainless steel.
Terrible Tip Alert: “Sharpen your clippers with aluminum foil.” Nope. Foil creates micro-burrs that snag nail fibers. Either replace or send to a professional sharpening service.
Case Study: From Ragged Edges to Salon-Ready in 3 Weeks
Last winter, my friend Lena—a graphic designer who types 10 hours a day—showed up with shredded nails and inflamed cuticles. She’d been using a 10-year-old travel kit with pitted, blunt clippers.
We swapped her gear for a pair of Tweezerman Deluxe Manicure Clippers (curved jaw, 420 stainless steel) and implemented the 5 best practices above. Within 21 days:
- Nail splitting dropped by 90%
- Cuticle redness vanished
- She stopped biting her nails (honestly, the clean cuts made them feel “finished”)
Lena’s takeaway? “It’s not vanity—it’s function. When your tools work right, your nails heal.”
FAQs About Manicure Nail Clippers
Can I use regular nail clippers for a manicure?
Technically yes—but if they’re designed for toenails (flat, heavy-duty), you risk splitting or crushing delicate fingernails. Always opt for fingernail-specific clippers with curved blades.
How often should I replace my manicure nail clippers?
Every 12–18 months with weekly use. Signs it’s time: ragged cuts, visible pitting on blades, or needing excessive force to snip.
Are expensive clippers worth it?
Yes—if they’re made of hardened stainless steel and ergonomically designed. Brands like Seki Edge, Zwilling, and Tweezerman invest in precision forging and quality control. Dollar-store clippers often use recycled metal that dulls within weeks.
Can I sharpen my own nail clippers?
Not safely at home. DIY methods (foil, sandpaper) ruin the factory bevel. Send them to a professional tool sharpener or replace them.
Do I need different clippers for natural vs. artificial nails?
Absolutely. Natural nails require fine-edged clippers; acrylics/gels need heavy-duty nippers with reinforced joints. Using clippers on enhancements causes shattering and lifts.
Conclusion
Great nails start long before polish—they begin with the right manicure nail clippers. Investing in precision-engineered, stainless steel tools isn’t indulgence; it’s prevention. Whether you’re a DIY enthusiast or a licensed tech, clean, sharp, properly shaped clippers protect your nail integrity, reduce injury risk, and make every trim effortless.
So next time you reach for those rusty travel clippers… pause. Your nails deserve better. And honestly? So do you.
Like a Tamagotchi, your nail health needs daily care—and weekly trims with the right tools.
Steel bites clean,
No ragged edge in sight—
Nails breathe easy.